NTP Server/Client, SNTP Client на MikroTik: Настройка точного времени
В данной статье мы поговорим о том, как настроить NTP Server на роутерах Mikrotik и для чего это нужно. Настройку точного времени на маршрутизаторе можно выполнить несколькими способами:
Освоить MikroTik вы можете с помощью онлайн-курса «Настройка оборудования MikroTik». В курсе изучаются все темы из официальной программы MTCNA. Автор – официальный тренер MikroTik. Материал подходит и тем, кто уже давно работает с оборудованием MikroTik, и тем, кто еще не держал его в руках. В состав входят 162 видеоурока, 45 лабораторных работ, вопросы для самопроверки и конспект.
У каждого из этих способов есть свои преимущества, отличия и тонкости настройки, которые мы детально разберем.
Для чего настраивать SNTP Client на Mikrotik
Настройка SNTP Client – это важный аспект, которым не следует пренебрегать по ряду причин:
Вот небольшая часть проблем, которых можно избежать настройкой точного времени на роутерах Mikrotik.
Mikrotik: настройка SNTP Клиента
Настройка выполняется просто. Для этого откроем Winbox и перейдем:
Далее нам нужно активировать клиент, установив соответствующую галочку и указать DNS имена NTP сервера для вашей страны. Список серверов времени находится по адресу: http://www.pool.ntp.org/ru/
Для Российской федерации будем использовать следующее сервера:
После внесения значений окно SNTP Client должно выглядеть следующим образом:

Чтобы добавить несколько значений DNS имен серверов времени, воспользуемся стрелочками (отмечены на рисунке шагом №3).
Через консоль:

Проверяем, все ли мы правильно настроили. Для этого перейдем:
Рекомендую ставить автоматическое определение часового пояса. Либо его можно указать вручную, выбрав из выпадающего списка.
Если часы не синхронизировались, то нужно немного подождать, так как обновление времени идет не онлайн, а через определенный интервал времени.
Если мы повторно перейдем в настройки SNTP Client:

То можем увидеть интервал, через который происходит синхронизация с NTP Сервером (Poll interval) и когда выполнялось последнее обновление (Last Update).
На этом настройка времени на Mikrotik закончена.
Mikrotik: настройка NTP Server и NTP Client для локальной сети
На роутерах Mikrotik есть возможность настроить NTP Server для локальной сети, чтобы хосты выполняли синхронизацию времени операционной системы непосредственно с маршрутизатора.
Для этого необходимо:
Установка Mikrotik NTP Server
Для начала нам нужно скачать дополнительный пакет для вашей архитектуры процессора. Как определить текущую версию системы и архитектуру процессора подробно описано в статье Mikrotik обновление прошивки RouterOS и установить его.
Переходим на официальный сайт Mikrotik в раздел Software:

В данном примере я скачиваю дополнительный пакет для роутера Mikrotik hAP ac lite (архитектура MIPSBE) для версии RouterOS 6.48.
Открываем Winbox, затем переносим пакет ntp-6.48-mipsbe.npk из архива, скаченного в предыдущем шаге. Если все сделали правильно, то увидим окно:

Перезагружаем маршрутизатор Mikrotik.
Настройка NTP Client на Mikrotik
Следующим шагом откроем System => NTP Client и выполним настройку:

ВАЖНО! Значительным минусом можно считать тот факт, что в данном клиенте нельзя указывать DNS имена серверов времени, а только их IP-адрес, при изменении которого синхронизация времени производиться не будет.
Для решения этой проблемы можно:
Пример того, как создавать скрипты и запускать их по расписанию можно узнать из статьи: Как сохранить, перенести и восстановить настройки Mikrotik.
Настройка NTP Server на Mikrotik
Следующим шагом активируем NTP Сервер:
NTP Сервер работает на 123 порту UDP. Поэтому убедитесь, что данный порт разрешен в firewall и слушается только внутри локальной сети.
Чтобы в Mikrotik открыть 123 порт, создадим правило:
Разместим правило выше запрещающего:

А также рекомендуем изучить статьи:
На этом настройка NTP Сервера на роутере Mikrotik закончена. Надеюсь, данная статья была вам полезна.
Освоить MikroTik вы можете с помощью онлайн-курса «Настройка оборудования MikroTik». В курсе изучаются все темы из официальной программы MTCNA. Автор – официальный тренер MikroTik. Материал подходит и тем, кто уже давно работает с оборудованием MikroTik, и тем, кто еще не держал его в руках. В состав входят 162 видеоурока, 45 лабораторных работ, вопросы для самопроверки и конспект.
ИТ База знаний
Полезно
— Онлайн генератор устойчивых паролей
— Онлайн калькулятор подсетей
— Руководство администратора FreePBX на русском языке
— Руководство администратора Cisco UCM/CME на русском языке
— Руководство администратора по Linux/Unix
Навигация
Серверные решения
Телефония
FreePBX и Asterisk
Настройка программных телефонов
Корпоративные сети
Протоколы и стандарты
Командная строка Mikrotik
Консольный доступ на Mikrotik используется для конфигурации и управления роутером с помощью терминала по telnet, SSH и т.д. Также консоль можно использовать для написания скриптов. Ниже вы найдете базовые команды, использующиеся для администрирования роутера.
Полный курс по Сетевым Технологиям
В курсе тебя ждет концентрат ТОП 15 навыков, которые обязан знать ведущий инженер или senior Network Operation Engineer

Иерархия
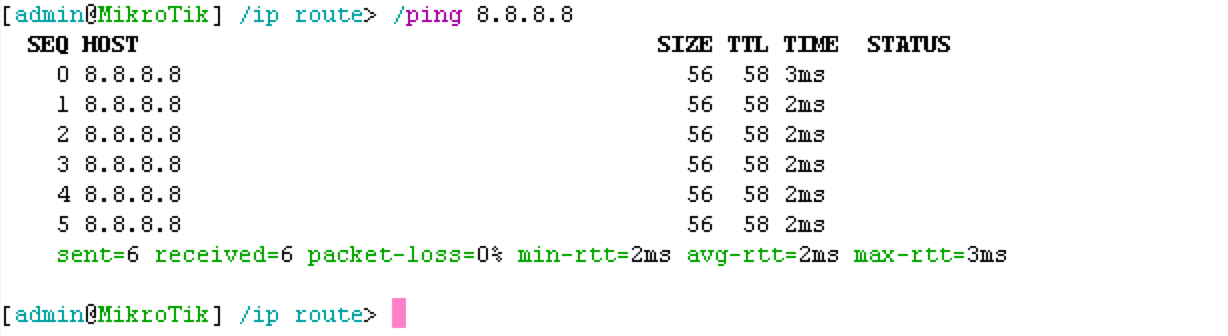
К примеру, введите команду ip route print для вывода таблицы маршрутизации:


Нумерация и названия сущностей

Автозаполнение

Основные команды
Горячие клавиши
Ниже приведен список самых полезных горячих клавиш, которые могут серьезно ускорить процесс настройки оборудования, и, даже спасти ситуацию в случае ввода некорректного сетевого адреса.
Полный курс по Сетевым Технологиям
В курсе тебя ждет концентрат ТОП 15 навыков, которые обязан знать ведущий инженер или senior Network Operation Engineer
Как посмотреть время работы mikrotik
В этой статье мы расскажем об извлечении данных о текущей «дате и времени» и помещении их в переменную для дальнейшего использования в скриптах.
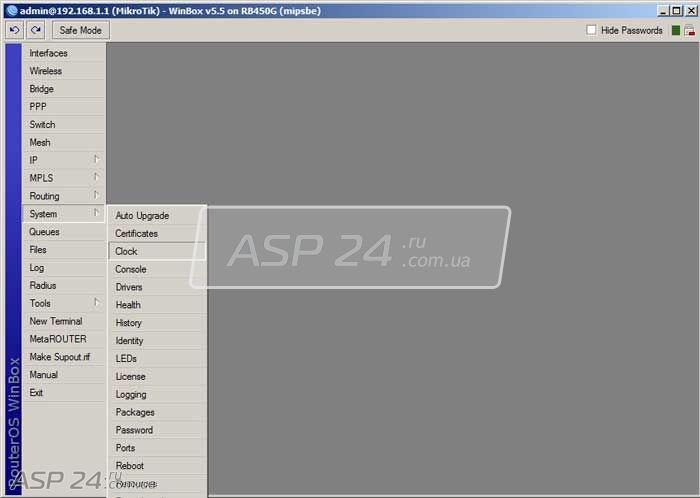
Рис.1. Mikrotik Routerboard System Clock.
Для начала мы перейдём в раздел System Clock.
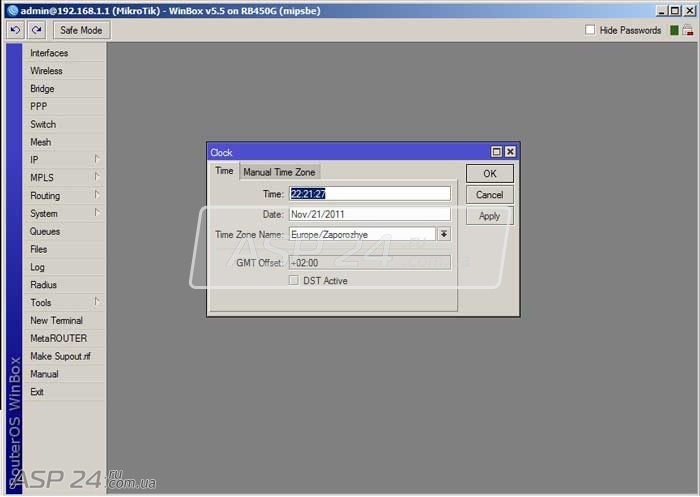
Рис.2. Mikrotik Routerboard Clock.
Диалоговое окно Clock предоставляет нам информацию о текущей дате и времени.
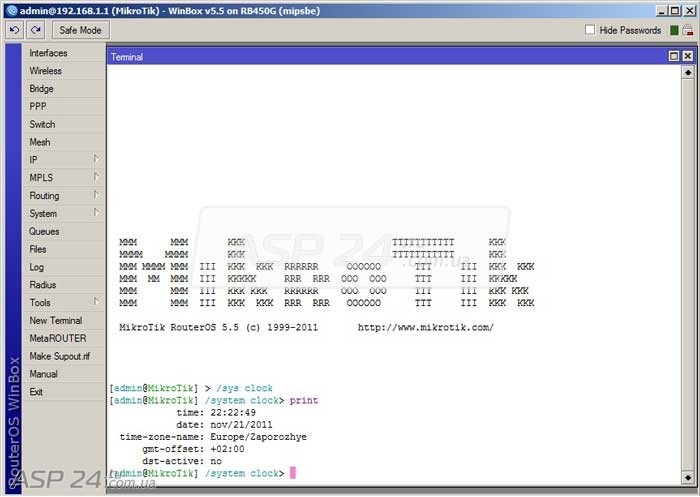
Рис.3. Mikrotik Routerboard Terminal.
Запускаем терминал в Mikrotik Routerboard. Затем переходим в нужный раздел и приступаем к извлечению данных.
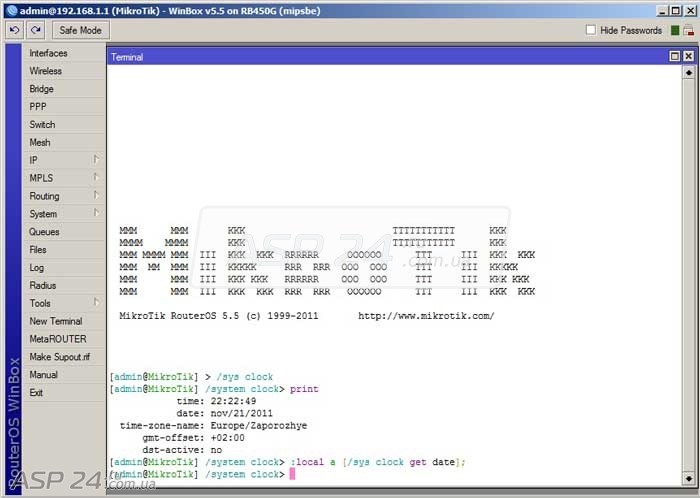
Рис.4. Mikrotik Routerboard, данные о дате.
Создаём локальную переменную а и при помощи команды get извлекаем данные из поля date:
:local a [/sys clock get date];
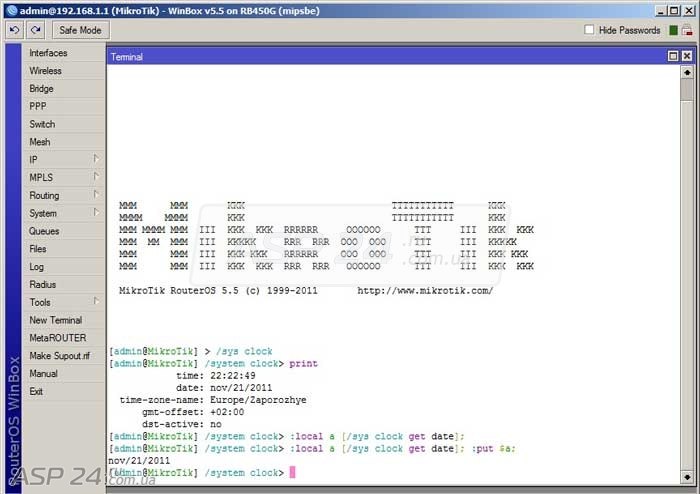
Рис.5. Mikrotik Routerboard, выводим данные на экран.
При помощи команды put выведем значение переменной а на экран. В результате этих действий в переменной а мы определим текущую дату.
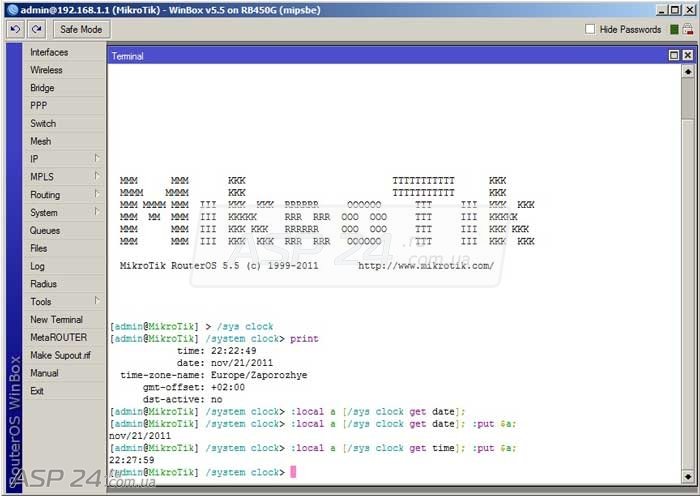
Рис.6. Mikrotik Routerboard, данные о текущем времени.
Так же, как и дату, извлекаем данные о текущем времени и заносим в переменную а.
Евгений Рудченко специально для ASP24.
Извлекаем данные о текущей дате и времени
В этой статье мы расскажем об извлечении данных о текущей “дате и времени” и помещении их в переменную для дальнейшего использования в скриптах.

Рис.1. Mikrotik Routerboard System Clock.
Для начала мы перейдём в раздел System Clock.

Диалоговое окно Clock предоставляет нам информацию о текущей дате и времени.

Рис.3. Mikrotik Routerboard Terminal.
Запускаем терминал в Mikrotik Routerboard. Затем переходим в нужный раздел и приступаем к извлечению данных.

Рис.4. Mikrotik Routerboard, данные о дате.
Создаём локальную переменную а и при помощи команды get извлекаем данные из поля date:
:local a [/sys clock get date];

Рис.5. Mikrotik Routerboard, выводим данные на экран.
При помощи команды put выведем значение переменной а на экран. В результате этих действий в переменной а мы определим текущую дату.

Рис.6. Mikrotik Routerboard, данные о текущем времени.
Так же, как и дату, извлекаем данные о текущем времени и заносим в переменную а.
Специально для ASP24.
Если Вы нашли ошибку в тексте, то выделите ее мышкой и нажмите Ctrl + Enter или нажмите здесь.
Большое спасибо за Вашу помощь! Мы скоро исправим ошибку!
Сообщение не было отправлено. Пожалуйста, попробуйте еще раз.
Command Line Interface
The console is used for accessing the MikroTik Router’s configuration and management features using text terminals, either remotely using a serial port, telnet, SSH, console screen within WinBox, or directly using monitor and keyboard. The console is also used for writing scripts. This manual describes the general console operation principles. Please consult the Scripting Manual on some advanced console commands and on how to write scripts.
Login Options
Console login options enable or disable various console features like color, terminal detection, and many other.
Additional login parameters can be appended to the login name after the ‘+’ sign.
If the parameter is not present, then the default value is used. If the number is not present then the implicit value of the parameter is used.
| Param | Default | Implicit | Description |
|---|---|---|---|
| «w» | auto | auto | Set terminal width |
| «h» | auto | auto | Set terminal height |
| «c» | on | off | disable/enable console colors |
| «t» | on | off | Do auto-detection of terminal capabilities |
| «e» | on | off | Enables «dumb» terminal mode |
Banner and Messages
The login process will display the MikroTik banner and short help after validating the user name and password.
After the banner can be printed other important information, like system note set by another admin, the last few critical log messages, demo version upgrade reminder, and default configuration description.
For example, the demo license prompt and last critical messages are printed
Command Prompt
At the end of the successful login sequence, the login process prints a banner that shows the command prompt, and hands over control to the user.
Default command prompt consists of user name, system identity, and current command path/>
For example, change the current path from the root to the interface then go back to the root
Use up arrow to recall previous commands from command history, TAB key to automatically complete words in the command you are typing, ENTER key to execute the command, Control-C to interrupt currently running command and return to prompt and ? to display built-in help.
The easiest way to log out of the console is to press Control-D at the command prompt while the command line is empty (You can cancel the current command and get an empty line with Control-C, so Control-C followed by Control-D will log you out in most cases).
It is possible to write commands that consist of multiple lines. When the entered line is not a complete command and more input is expected, the console shows a continuation prompt that lists all open parentheses, braces, brackets, and quotes, and also trailing backslash if the previous line ended with backslash-white-space.
When you are editing such multiple line entries, the prompt shows the number of current lines and total line count instead of the usual username and system name.
Sometimes commands ask for additional input from the user. For example, the command ‘ /password ‘ asks for old and new passwords. In such cases, the prompt shows the name of the requested value, followed by colon and space.
Hierarchy
The console allows the configuration of the router’s settings using text commands. Since there is a lot of available commands, they are split into groups organized in a way of hierarchical menu levels. The name of a menu level reflects the configuration information accessible in the relevant section.
For example, you can issue the /ip route print command:
Instead of typing `/ip route` path before each command, the path can be typed only once to move into this particular branch of the menu hierarchy. Thus, the example above could also be executed like this:
Each word in the path can be separated by space (as in the example above) or by «/»
Notice that the prompt changes in order to reflect where you are located in the menu hierarchy at the moment. To move to the top level again, type » / «
You can also use / and .. to execute commands from other menu levels without changing the current level:
Item Names and Numbers
Many of the command levels operate with arrays of items: interfaces, routes, users, etc. Such arrays are displayed in similarly-looking lists. All items in the list have an item number followed by flags and parameter values.
To change the properties of an item, you have to use the set command and specify the name or number of the item.
Item Names
Some lists have items with specific names assigned to each of them. Examples are interface or user levels. There you can use item names instead of item numbers.
You do not have to use the print command before accessing items by their names, which, as opposed to numbers, are not assigned by the console internally, but are properties of the items. Thus, they would not change on their own. However, there are all kinds of obscure situations possible when several users are changing the router’s configuration at the same time. Generally, item names are more «stable» than the numbers, and also more informative, so you should prefer them to numbers when writing console scripts.
Item Numbers
You can specify multiple items as targets to some commands. Almost everywhere, where you can write the number of items, you can also write a list of numbers.
General Commands
| Property | Description |
|---|---|
| add | This command usually has all the same arguments as a set, except the item number argument. It adds a new item with the values you have specified, usually at the end of the item list, in places where the order of items is relevant. There are some required properties that you have to supply, such as the interface for a new address, while other properties are set to defaults unless you explicitly specify them. |
Input Modes
It is possible to switch between several input modes:
Quick Typing
/inte[Tab]_ becomes /interface _
If there is more than one match, but they all have a common beginning, which is longer than that what you have typed, then the word is completed to this common part, and no space is appended:
/interface set e[Tab]_ becomes /interface set ether_
If you’ve typed just the common part, pressing the tab key once has no effect. However, pressing it for the second time shows all possible completions in compact form:
Another way to press fewer keys while typing is to abbreviate command and argument names. You can type only the beginning of the command name, and, if it is not ambiguous, the console will accept it as a full name. So typing:
It is possible to complete not only the beginning, but also any distinctive sub-string of a name: if there is no exact match, the console starts looking for words that have string being completed as first letters of a multiple word name, or that simply contain letters of this string in the same order. If a single such word is found, it is completed at the cursor position. For example:
Console Search
Console search allows performing keyword search through the list of RouterOS menus and the history. The search prompt is accessible with the [Ctrl+r] shortcut.
Internal Chat System
RouterOS console has a built-in internal chat system. This allows remotely located admins to talk to each other directly in RouterOS CLI. To start the conversation prefix the intended message with the # symbol, anyone who is logged in at the time of sending the message will see it.