Command Line Interface
The console is used for accessing the MikroTik Router’s configuration and management features using text terminals, either remotely using a serial port, telnet, SSH, console screen within WinBox, or directly using monitor and keyboard. The console is also used for writing scripts. This manual describes the general console operation principles. Please consult the Scripting Manual on some advanced console commands and on how to write scripts.
Login Options
Console login options enable or disable various console features like color, terminal detection, and many other.
Additional login parameters can be appended to the login name after the ‘+’ sign.
If the parameter is not present, then the default value is used. If the number is not present then the implicit value of the parameter is used.
| Param | Default | Implicit | Description |
|---|---|---|---|
| «w» | auto | auto | Set terminal width |
| «h» | auto | auto | Set terminal height |
| «c» | on | off | disable/enable console colors |
| «t» | on | off | Do auto-detection of terminal capabilities |
| «e» | on | off | Enables «dumb» terminal mode |
Banner and Messages
The login process will display the MikroTik banner and short help after validating the user name and password.
After the banner can be printed other important information, like system note set by another admin, the last few critical log messages, demo version upgrade reminder, and default configuration description.
For example, the demo license prompt and last critical messages are printed
Command Prompt
At the end of the successful login sequence, the login process prints a banner that shows the command prompt, and hands over control to the user.
Default command prompt consists of user name, system identity, and current command path/>
For example, change the current path from the root to the interface then go back to the root
Use up arrow to recall previous commands from command history, TAB key to automatically complete words in the command you are typing, ENTER key to execute the command, Control-C to interrupt currently running command and return to prompt and ? to display built-in help.
The easiest way to log out of the console is to press Control-D at the command prompt while the command line is empty (You can cancel the current command and get an empty line with Control-C, so Control-C followed by Control-D will log you out in most cases).
It is possible to write commands that consist of multiple lines. When the entered line is not a complete command and more input is expected, the console shows a continuation prompt that lists all open parentheses, braces, brackets, and quotes, and also trailing backslash if the previous line ended with backslash-white-space.
When you are editing such multiple line entries, the prompt shows the number of current lines and total line count instead of the usual username and system name.
Sometimes commands ask for additional input from the user. For example, the command ‘ /password ‘ asks for old and new passwords. In such cases, the prompt shows the name of the requested value, followed by colon and space.
Hierarchy
The console allows the configuration of the router’s settings using text commands. Since there is a lot of available commands, they are split into groups organized in a way of hierarchical menu levels. The name of a menu level reflects the configuration information accessible in the relevant section.
For example, you can issue the /ip route print command:
Instead of typing `/ip route` path before each command, the path can be typed only once to move into this particular branch of the menu hierarchy. Thus, the example above could also be executed like this:
Each word in the path can be separated by space (as in the example above) or by «/»
Notice that the prompt changes in order to reflect where you are located in the menu hierarchy at the moment. To move to the top level again, type » / «
You can also use / and .. to execute commands from other menu levels without changing the current level:
Item Names and Numbers
Many of the command levels operate with arrays of items: interfaces, routes, users, etc. Such arrays are displayed in similarly-looking lists. All items in the list have an item number followed by flags and parameter values.
To change the properties of an item, you have to use the set command and specify the name or number of the item.
Item Names
Some lists have items with specific names assigned to each of them. Examples are interface or user levels. There you can use item names instead of item numbers.
You do not have to use the print command before accessing items by their names, which, as opposed to numbers, are not assigned by the console internally, but are properties of the items. Thus, they would not change on their own. However, there are all kinds of obscure situations possible when several users are changing the router’s configuration at the same time. Generally, item names are more «stable» than the numbers, and also more informative, so you should prefer them to numbers when writing console scripts.
Item Numbers
You can specify multiple items as targets to some commands. Almost everywhere, where you can write the number of items, you can also write a list of numbers.
General Commands
| Property | Description |
|---|---|
| add | This command usually has all the same arguments as a set, except the item number argument. It adds a new item with the values you have specified, usually at the end of the item list, in places where the order of items is relevant. There are some required properties that you have to supply, such as the interface for a new address, while other properties are set to defaults unless you explicitly specify them. |
Input Modes
It is possible to switch between several input modes:
Quick Typing
/inte[Tab]_ becomes /interface _
If there is more than one match, but they all have a common beginning, which is longer than that what you have typed, then the word is completed to this common part, and no space is appended:
/interface set e[Tab]_ becomes /interface set ether_
If you’ve typed just the common part, pressing the tab key once has no effect. However, pressing it for the second time shows all possible completions in compact form:
Another way to press fewer keys while typing is to abbreviate command and argument names. You can type only the beginning of the command name, and, if it is not ambiguous, the console will accept it as a full name. So typing:
It is possible to complete not only the beginning, but also any distinctive sub-string of a name: if there is no exact match, the console starts looking for words that have string being completed as first letters of a multiple word name, or that simply contain letters of this string in the same order. If a single such word is found, it is completed at the cursor position. For example:
Console Search
Console search allows performing keyword search through the list of RouterOS menus and the history. The search prompt is accessible with the [Ctrl+r] shortcut.
Internal Chat System
RouterOS console has a built-in internal chat system. This allows remotely located admins to talk to each other directly in RouterOS CLI. To start the conversation prefix the intended message with the # symbol, anyone who is logged in at the time of sending the message will see it.
Mikrotik: сброс настроек, бекапы и DualBoot
Разбор множества мелких, относительно связанных между собой, тем: программный и аппаратный сброс настроек, функция Protected RouterBoot, бекапы и экспорт конфигурации, разбивка flash памяти на разделы.
Программный сброс настроек
Если есть доступ к роутеру от пользователя с full правами, то можно сбросить все настройки через [System] → [Reset Configuration]
Аппаратный сброс настроек
Все зависит от модели роутера, возможно три варианта:
Присутствует кнопка reset
Для начала отключаем питание, зажимаем reset и включаем питание. Отпускаем через:
На wiki утверждают, что все девайсы оснащены подобной площадкой. Ради интереса вскрыл RB491-2nD и не обнаружил таковой.
Технология сброса: отключаем питание, замыкаем площадку(бипер издает хрипящий писк) и не отпускаем до полной загрузки.
Присутствует на старых моделях.
Технология сброса: отключаем питание, замыкаем перемычку, ждем полной загрузки, убираем перемычку.
Protected RouterBoot
Может случится ситуация, когда после сброса чужого(иначе вы бы знали) роутера он не будет загружаться дальше «первого пика» — это новая фитча от Mikrotik затирающая всю флеш память( включая RouterOS), для восстановления потребуется netinstall.
RouterBoot — начальный загрузчик на девайсах Mikrotik, с ним можно взаимодействовать через Serial интерфейс и одно из предназначений Protected RouterBoot не давать вмешиваться в процесс загрузки.
Загрузчик разделен на две части:

Посмотреть текущие версии можно в [System] → [RouterBoard]. Кнопкой [Upgrade] производится обновление Current загрузчика. Если система работает плохо и загружается только с резервного(как написано разделом выше), то в [Settings] можно явно указать recovery загрузчик в качестве постоянного, опция Auto Upgrade для обновления current загрузчика вместе с RouterOS. И раз мы тут — опция Silent Boot отключает звуки во время загрузки.
На каких версиях Firmware работает Protected RouterBoot
Гарантированную работу обещают для девайсов с Factory Firmware 3.24 и выше, если ваш девайс более старый, то функцию возможно активировать установив специальный пакет, но только на Bugfix версии RouterOS.
Даунгрейд до Bugfix и спец. версия загрузчика
[System] → [RouterBoard] → [Settings]
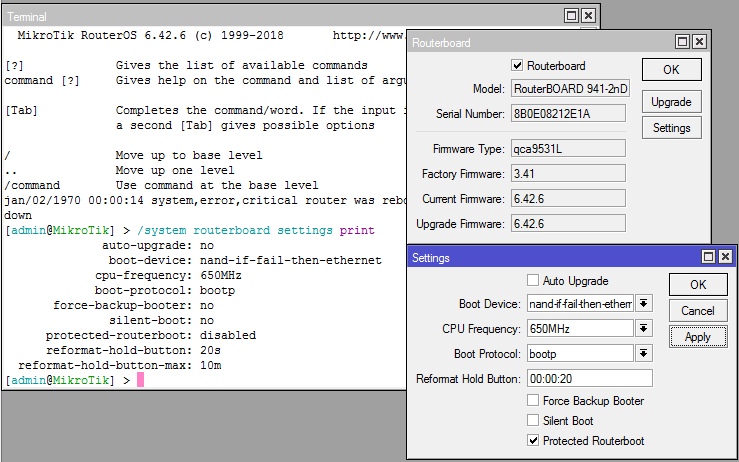
Включаем Protected RouterBoot=yes, что теперь.
Я не призываю вас включать эту опцию в обязательном порядке, думайте сами когда оно вам надо, а когда можно обойтись без подобных мер.
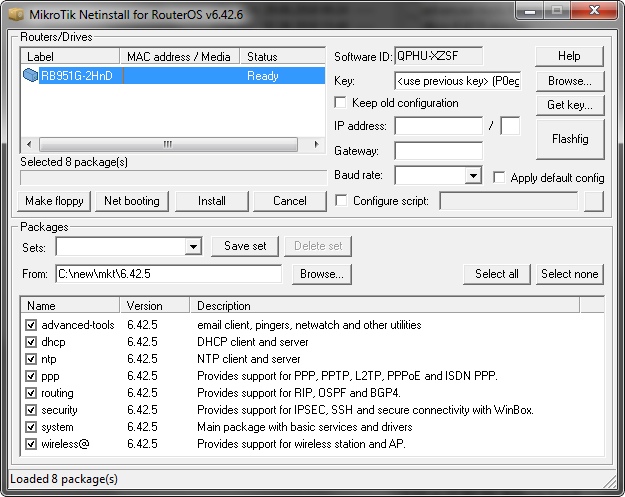
Восстановление прошивки средствами netinstall
Netinstall — универсальный инструмент для прошивки и предварительной настройки роутеров MikroTik. При использовании происходит ворматирование внутренней памяти и конфигурации, без изменения останутся только настройки в [System] → [RouterBOARD]
Конфликтует с некоторыми фаерволами и антивирусами(добавлять в исключения), могут быть проблемы при запуске от пользователей с ограниченными правами — запускаем «От администратора».

На что еще способен netinstall
Бекап и экспорт конфигурации в Mikrotik

Name — имя файла. по умолчанию будет —
Password — пароль. По умолчанию используется пароль текущего пользователя.
Don’t encrypt — не шифровать бекап.
[Files] → [Подсветить необходимый файл] → [Restore]

Экспорт и импорт конфигурации
export не сохраняет конфигурацию в файл, если явно не задать ключ file= расширение rsc будет добавлено автоматически.
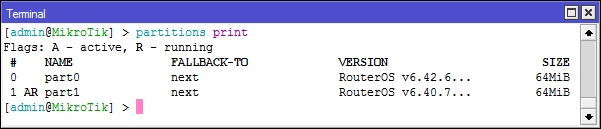
DualBoot в Mikrotik(Partition)
Flash накопитель можно разбить на несколько разделов и установить несколько копий RouterOS(в том числе различных). В случае неудачной загрузки с основного раздела будет загружаться следующий указанный. Функция доступна на девайсах с MIPS, PowerPC и CCR серии.
Разбивка на разделы:

Необходимо указать итоговое число разделов. Есть два ограничения: максимальное число разделов — 8 и минимальный размер раздела: 32MB on MIPS; 40MB on PowerPC; 48MB on CCR.
Новый раздел будет пустым, необходимо скопировать на него текущую прошивку через [Copy to].

В консоли лучше видны свойства разделов: Активный(A) — с которого будет произведена следующая загрузка и раздел с которого была загружена система®.
Смена активного раздела происходит в его свойствах кнопкой [Activate]. Опция Fallback to отвечает за выбор раздела, если загрузка не удалась.
[Save Config To] — Сохранить конфигурацию с текущего® раздела на выбранный.
[Restore Config From] — Сохранить конфигурацию с выбранного раздела на текущий®.
Функционал интересный, но имеет два недостатка: Не все роутеры комплектуются достаточным количеством flash памяти. Сбои в RouterOS, даже при обновлении, не такое частое явление.
Configuration Management
This article describes a set of commands used for configuration management.
A simple example to demonstrate the addition of firewall rule and how to undo and redo the action:
We have added firewall rule and in /system history we can see all what is being done.
Let’s undo everything:
As you can see firewall rule disappeared.
Now redo the last change:
System history is capable of showing exact CLI commands that will be executed during Undo or Redo actions even if we perform the action from GUI, for example, detailed history output after adding TCP accept rule from WinBox:
Safe Mode
Sometimes it happens that the router’s configuration is changed in a way that will make the router inaccessible (except local console). Usually, this is done by accident, but there is no way to undo the last change when the connection to the router is already cut. Safe mode can be used to minimize such risk.
Safe mode is entered by pressing Ctrl-X. To save changes and quit safe mode, press Ctrl-X again. To exit without saving the made changes, hit Ctrl-D

Message Safe Mode taken is displayed and prompt changes to reflect that session is now in safe mode. In WinBox safe mode is enabled by toggling the Safe Mode toggle button on the left side of the toolbar.
All configuration changes that are made (also from other login sessions), while the router is in safe mode, are automatically undone if the safe mode session terminates abnormally. You can see all such changes that will be automatically undone tagged with an F flag in system history:
Now, if telnet connection, WinBox terminal (if the safe mode was enabled on WinBox terminal window), or WinBox connection is cut, then after a while (TCP timeout is 9 minutes) all changes that were made while in safe mode will be undone. Exiting session by Ctrl-D also undoes all safe mode changes, while /quit does not.
If another user tries to enter safe mode, he’s given the following message:
If too many changes are made while in safe mode, and there’s no room in history to hold them all (currently history keeps up to 100 most recent actions), then the session is automatically put out of the safe mode, no changes are automatically undone. Thus, it is best to change the configuration in small steps, while in safe mode. Pressing Ctrl—X twice is an easy way to empty the safe mode action list.
System Backup/Restore
System backup is the way to completely clone routers configuration in binary format. The backup file contains not just configuration, but also statistics data, logs, etc. The backup file is best used to save and restore configuration on the same device, for moving configuration to other devices, use export files instead.
Backup files contain sensitive information (passwords, keys, certificates). The file can be encrypted, but even then backups should be stored only in a secure location.
Restoring backup files should be done only on the same router or on a similar router when the previous router fails. A backup must not be used to clone configuration on multiple network routers.
Example to save and load backup file:
Import/Export
RouterOS allows to export and import of parts of the configuration in plain text format. This method can be used to copy bits of configuration between different devices, for example, clone the whole firewall from one router to another.
An export command can be executed from each individual menu (resulting in configuration export only from this specific menu and all its sub-menus) or from the root menu for complete config export.
Following command parameters are accepted:
| Property | Description |
|---|---|
| compact | Output only modified configuration, the default behavior |
| file | Export configuration to a specified file. When the file is not specified export output will be printed to the terminal |
| hide-sensitive | Hide sensitive information, like passwords, keys, etc. |
| verbose | With this parameter, the export command will output whole configuration parameters and items including defaults. |
For example export configuration from /ip address menu and save it to file:
By default export command writes only user-edited configuration, RouterOS defaults are omitted.
For example, IPSec default policy will not be exported, and if we change one property then only our change will be exported:
Notice the * flag, it indicates that entry is system default and cannot be removed manually.
Here is the list of all menus containing default system entries
| Menu | Default Entry |
|---|---|
| /interface wireless security-profiles | default |
| /ppp profile | «default», «default-encryption» |
| /ip hotspot profile | default |
| /ip hotspot user profile | default |
| /ip ipsec policy | default |
| /ip ipsec policy group | default |
| /ip ipsec proposal | default |
| /ip ipsec mode-conf | read-only |
| /ip smb shares | pub |
| /ip smb users | guest |
| /ipv6 nd | any |
| /mpls interface | all |
| /routing bfd interface | all |
| /routing bgp instance | default |
| /routing ospf instance | default |
| /routing ospf area | backbone |
| /routing ospf-v3 instance | defailt |
| /routing ospf-v3 area | backbone |
| /snmp community | public |
| /tool mac-server mac-winbox | all |
| /tool mac-server | all |
| /system logging | «info», «error», «warning», «critical» |
| /system logging action | «memory», «disk», «echo», «remote» |
| /queue type | «default», «ethernet-default», «wireless-default», «synchronous-default», «hotspot-default», «only-hardware-queue», «multi-queue-ethernet-default», «default-small» |
Configuration Import
Root menu command import allows running configuration script from the specified file. Script file (with extension «.rsc») can contain any console command including complex scripts.
For example, load saved configuration file
Import command allows to specify following parameters:
| Property | Description |
|---|---|
| from-line | Start executing the script from the specified line number |
| file-name | Name of the script (.rsc) file to be executed. |
| verbose | Reads each line from the file and executes individually, allowing to debug syntax or other errors more easily. |
Auto Import
It is also possible to automatically execute scripts after uploading to the router with FTP or SFTP. The script file must be named with extension *.auto.rsc. Once the commands in the file are executed, a new *.auto.log file is created which contains import success or failure information.
«.auto.rsc» in the filename is mandatory for a file to be automatically executed.
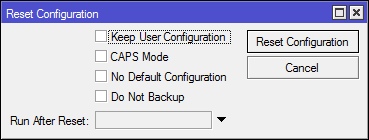
Configuration Reset
RouterOS allows resetting configuration with /system reset-configuration command
This command clears all configuration of the router and sets it to the factory defaults including the login name and password (‘admin’ with an empty password). For more details on the default configuration see the list.
After the configuration reset command is executed router will reboot and load the default configuration.
The backup file of the existing configuration is stored before reset. That way you can easily restore any previous configuration if reset is done by mistake.
If the router has been installed using Netinstall and had a script specified as the initial configuration, the reset command executes this script after purging the configuration. To stop it from doing so, you will have to reinstall the router.
It is possible to override default reset behavior with the parameters below:
For example hard reset configuration without loading default config and skipping backup file:
Manual:Configuration Management

Applies to RouterOS: ALL
Contents
Summary
This manual introduces you with commands which are used to perform the following functions:
Description
The configuration backup can be used for backing up MikroTik RouterOS configuration to a binary file, which can be stored on the router or downloaded from it using FTP for future use. The configuration restore can be used for restoring the router’s configuration, exactly as it was at the backup creation moment, from a backup file. The restoration procedure assumes the configuration is restored on the same router, where the backup file was originally created, so it will create partially broken configuration if the hardware has been changed.
The configuration export can be used for dumping out complete or partial MikroTik RouterOS configuration to the console screen or to a text (script) file, which can be downloaded from the router using FTP protocol. The configuration dumped is actually a batch of commands that add (without removing the existing configuration) the selected configuration to a router. The configuration import facility executes a batch of console commands from a script file.
System reset command is used to erase all configuration on the router. Before doing that, it might be useful to backup the router’s configuration.
System Backup
The system backup feature allows you to effortlessly save and load device’s configuration. Read more about the backup feature in the System/Backup section.
Exporting Configuration
The export command prints a script that can be used to restore configuration. The command can be invoked at any menu level, and it acts for that menu level and all menu levels below it. The output can be saved into a file, available for download using FTP.
Command Description
Example
To make an export file:
To see the files stored on the router:
Compact Export
Starting from v5.12 compact export was added. It allows to export only part of configuration that is not default RouterOS config.
Note: Starting from v6rc1 «export compact» is default behavior. To do old style export use export verbose
For example compact OSPF export:
Compact export introduces another feature that indicates which part of config is default on RouterOS and cannot be deleted. As in example below ‘*’ indicates that this OSPF instance is part of default configuration.
List of default config by menus that cannot be removed:
| Menu | Entries |
|---|---|
| /interface wireless security-profiles | default |
| /ppp profile | «default», «default-encryption» |
| /ip hotspot profile | «default» |
| /ip hotspot user profile | «default» |
| /ip ipsec proposal | «default» |
| /ip smb shares | «pub» |
| /ip smb users | «guest» |
| /ipv6 nd | «all» |
| /mpls interface | «all» |
| /routing bfd interface | «all» |
| /routing bgp instance | «default» |
| /routing ospf instance | «default» |
| /routing ospf area | «backbone» |
| /routing ospf-v3 instance | «default» |
| /routing ospf-v3 area | «backbone» |
| /snmp community | «public» |
| /tool mac-server mac-winbox | «all» |
| /tool mac-server | «all» |
| /system logging | «info», «error», «warning», «critical» |
| /system logging action | «memory», «disk», «echo», «remote» |
| /queue type | «default», «ethernet-default», «wireless-default», «synchronous-default», «hotspot-default», «only-hardware-queue», «multi-queue-ethernet-default», «default-small» |
Importing Configuration
The root level command /import [file_name] executes a script stored in the specified file. It will add the configuration from the specified file to an existing configuration. This file may contain any console commands, including scripts. Can be used to restore configuration or parts of it after configuration loss.
Command Description
Automatic Import
Once the file is uploaded, it is automatically executed. Information about the success of the commands that were executed is written to anything.auto.log
Example
To load the saved export file use the following command:
Configuration Reset
Command name: /system reset-configuration
Description
The command clears all configuration of the router and sets it to the default including the login name and password (‘admin’ and no password), IP addresses and other configuration is erased, interfaces will become disabled. After the reset command router will reboot. The default is either the factory default, that you can see in the article Default configurations, or it can be a custom default, that can be loaded by including an RSC file when doing Netinstall or if specified with a branding package.
Command Description
Note: If run-after-reset is set then no-defaults parameter will be ignored and only the specified script will be loaded!
Warning: Warning: If the device has a folder named «flash», then the confscript.rsc file must be stored in that folder to work with «run-after-reset» command. Everything outside this folder is stored on the RAM drive which contents are deleted on reboot or power cycle.
Warning: If the router has been installed using netinstall and had a script specified as the initial configuration, the reset command executes this script after purging the configuration. To stop it doing so, you will have to reinstall the router.
Example
Import troubleshooting
Things that should be removed from export files that were created with: «/export», before attempting import on new device.
In case of problematic import, attempt the following:
Startup delay
If your configuration relies on interfaces that might not yet have started up upon command execution, it is suggested to introduce delays, or to monitor until all needed interfaces are available. This example script allows you to set how many interfaces you are expecting, and how long to wait until they become available:
The above script will wait until there are 10 interfaces visible, or 30 seconds. If there are no 10 interfaces in this time, it will put a message in the log. Modify the variables according to your needs.